Tuesday, 8 February 2011

OCA Assignment 1 - my thoughts on 'What have you achieved?'

Here are my thoughts and responses to the questions posed under "What have you achieved?" at the end of Assignment 1

  • did you feel that your finished samples fulfilled the project theme that you chose to work with?  did you make the right choices and decisions when selecting at each stage of the project?  If not what would you change and how would you alter the outcome?
I feel happy to answer this question with a 'yes' because in the end I chose a theme that was personal for and to me.  My choices and decisions were therefore direct, ie did I like the result?  could I live with this?  However, this would have been more difficult if the project had been for a third party.  Plus the information provided in the assignment was very limited, giving little practical information that would be essential if you were carryuing out the project for a third party.

For example I have assumed that I was making samples for fabrics that I would be creating, but this could easily not have been so, in which case practical decisions would have needed to be made regarding cost, time, equipment, materials and so on.  So in those circumstances then my answer could easily be no, I didn't make the right choices and decisions.  However, I'm a practical person.  So, even though I assumed the finished items would be made by me for me, I incorported questions like 'could I live with this for a long period of time?', 'would I like to make a larger piece of this?', and 'does this balance between being practical and unusual?'  These questions and the answers to them were partly why I rejected using the cut away samples that I used, as in both cases they failed one or more of the questions.

Of course there were lots of techniques that I didn't try when doing my samples - printing on fabric for example - and there are those that could say that the omission of these techniques was a bad choice.
  • can you see a clear line of progression from source material through to the finished sample pieces?
This is always an interesting question to answer, because obviously I'm close to the subject so might see something that others might find hard to observe.  However, the curved lines were in the original observation study, and they continue through to my final samples.  In the end I made a conscious decision to utilise a particular source of the curved lines (those in the Liscio logo) and not start to use other curves that were appearing.  I aided this by bending my 'flexible curve' into a shape resembling them and did my best to keep to using this same shape through the initial sketching to the drawing of the curves on my final samples.  In other words, I did my best to concentrate on one particular source area, and not go off at too many tangents, although I did look at some other potential ideas and incorporate a broader range of ideas for samples etc in my sketchbook.  This was deliberate because one thing I have learnt in the past is that when you are creative it is far too easy to get drawn down too many potential paths and cul-de-sacs and become lost in a world of all the things you'd like to try.  Obviously the more time that is available the less strict you have to be on this, and clearly you have to incorporate some variances in order to explore a theme, plus a lot of good ideas are often discovered as 'accidents'!  However,  I feel that what I am doing now is a bit like learning any new skill.  You have to limit yourself and practice well at each level, gradually increasing your knowledge and confidence, however tempting it is to let those areas that interest you run on ahead without you building a strong enough foundation.  This could of course just be my approach, but at this time I think it is the best one for me personally and will help me to achieve what I need to achieve in order to complete the course.
  • how useful was the initial 'brainstorming' exercise and assembling of the word list in stimulating your imagination and in helping you to define and focus on an atmosphere or mood?
I think an exercise such as this is always useful provided you do just 'brainstorm' and quickly jot down what comes to mind rather than worry over it.  I literally put down in words the thoughts that were in my head.
  • how important was the choice of fibre in terms of determining the qualities that you achieved?
I deliberately restricted myself to only a limited range of fibres for this project.  I stuck to the same main fabric and all of the samples are produced using a small range of additional fabrics or threads.  I think this arose from the fact that my theme led me to look for a simplistic result.  Less is more in this case, the interest being created by the curved shapes and the contrast between the white the the splashes of colour and texture.  That approach fitted this project.  Another project could be totally different.  For example, if I'd been inspired by the curves but not used the colour palette nor the modern essence of the building I could have used lots of lovely textured fabrics and threads in gold, bronze and brown (some of my favouite colours!) to create something totally different.
  • how important was the use of colour in this project to create the right atmosphere or mood?
To me colour is always important!  However, in this instance it wasn't so much the use of colour, but rather the selective use of colour in a limited way that was necessary to create the right atmosphere or mood.  Less was more, and only one of my final samples is fully coloured, chosen to compliment the other two samples which are basically plain with coloured highlights.  I saw this as a key element when choosing which samples I would put together to be my final three.
  • did you find it difficult to co-ordinate your samples so that they could be used together in some way?
No, I didn't.  I think that having followed the process through the resulting choices work well together.  That is not to say that I couldn't have created several variations even of the final three samples to give more options that could work together, of course!
  • how do you envisage your samples being used in your chosen environment?
Final sample 1


I envisaged this sample as being used for curtains any any other areas where drape was required.  That said, as can be seen from my test samples I did create a version in another colour way (ie lime main, pink stitching) that demonstrates that this could be used for an insert in a cushion cover for example.

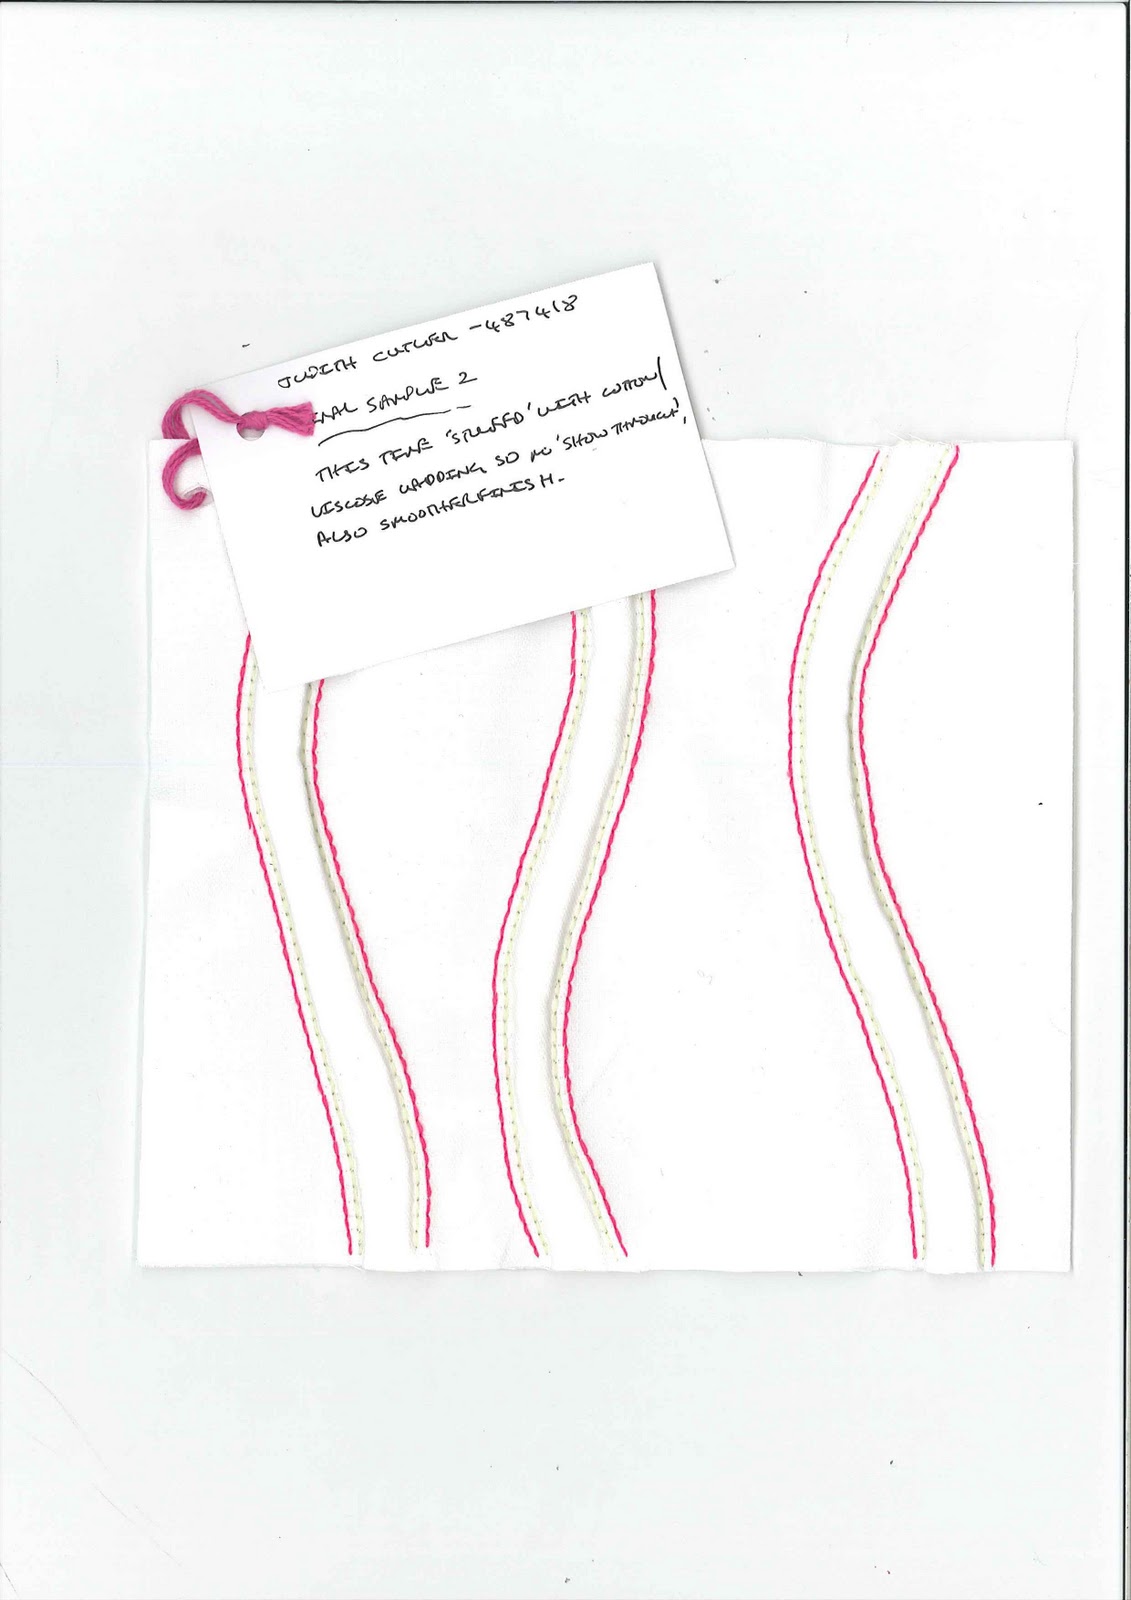
Final sample 2

This sample has a 3d look, so would look really good where that could be seen.  Again it could make a good cushion cover - one that you probably wanted to touch!  It might look interesting as a lamp shade.  If it was decided to use final sample 1 as a net curtain, then this sample could make an interesting curtain to go with it.  I did think at one point that it could be used to make a fascinating wall hanging, with the 3d effect creating small shadows.


Final sample 3


This is the sample that I see being used to make chair covers, table cloths and that sort of thing, where sample 1 would probably stretch too much and the holes would prove a nuisance (fingers and buttons on clothing getting stuck in them) and the raised ridges in sample 2 would either be uncomfortable to sit on or become squashed with constant use.  Of course the curved stripes don't have to be all over - nor do those in sample 2, and for that matter strips of sample 1 could be used as inserts into curtains alongside just the plain fabric/strips of fabric based on samples 2 or 3.  The whole point of making co-ordinating fabrics is that they suggest options for mixing and matching!

Wednesday, 12 January 2011

City & Guilds Level 3 Machine Embroidery - Class 4, 07/01/11

Our original class date had been 3rd December, but the heavy snow falls and icy conditions at the time meant that this had to be cancelled.

Anyway, this day was our 'dyeing day' when we had a go at tray dying and microwave dying, although for my purposes I actually did some dying in plastic bags in an endeavour to create strong plain colours that could be useful for my finished wall hanging.

The dye used throughout was Procion MX which our tutor supplied and mixed for us and we all contributed towards the cost of as this seemed the best way for a group working together in a classroom environment.  The tray dying was mostly done in (clean!) cat litter trays.  We soaked the pieces of fabric first in a bucket of soda ash solution, and then added the dyes to the damp fabric and left them in the tray for a few hours to 'take'.  We mixed the dyes to try and create blends and patterns, screwed up or folded the fabric, added a few resists here and there (tied up with string, stitching, tying knots around plastic shapes etc) and generally experimented.  After the few hours the fabric pieces were rinsed in plain water and inspected to see how they turned out, and if what happened was what we expected!

The microwave dying involved a similar process, but we tended to spray the dye onto the fabric in a more controlled manner, sometimes adding rock salt or similar to give distorting effects, and used a range of fabric types (plain, already patterned, calico, silk, linen, lace - although nothing that had any metal fibre in it to the best of our knowledge as that's not a good idea in the microwave!).  The fabric pieces were put into a suitable microwaveable container, eg plactic ice cream box, covered with/wrapped in microwaveable cling film and 'cooked' for a couple of minutes.  After cooling the pieces were again rinsed in plain water and the results examined.

Here are my samples from the micorwave dying.  It was obvious that the natural fibres generally took the dye better than the man made fibres, although there were a couple of variances.
 As mentioned above, because I knew that for my wall hanging I would be using BU corporate colours I wanted to see if I could produce some pieces of fabric that were plain dyed with strong colours as near as I could achieve to these with what was available on the day.  In order to do this I did something different to my classmates.  I had brought along a few threads and pieces of plain fabric either in white or a neutral colour.  I then made up 5 bags with the same set of sample pieces in each and added dye to these in the hope of achieving black, lime, hot pink, sunshine yellow, and orange.  I sealed the bags and left the samples soaking in the dye mix for over 24 hours, not rinsing them until I was at home the next day.  Here is a picture of the results as stuck into my sketchbook.


On the whole I was really pleased with the results.  The most disappointing was the black which really looks like a dark blue/charcoal colour on all of the samples.  However, on the whole the rest of the samples have turned out very well for a first attempt.  ;o)

There are a couple of things that need to be remembered when looking at these.  Firstly the 'original' colour squares stuck at the top of each column are printed  on while paper using a colour laser printer at work.  However, I've noticed that when I print using the different printers we have, even though they are all industrial laser printers from the same manufacturer, the finished colours can vary.  However, I don't need precision for this so I'm happy that I was able to produce 4 out of the 5 very close to what I was looking for, and certainly close enough to be able to use snippets of them to add colour to my project.

The other thing to remember is that I didn't mix the dye solutions, nor did I keep any record of how much dye was added to each bag, and I had to mix the colours available on the day to create what I thought looked like it might turn out OK.  That being the case I couldn't guarantee to achieve exactly the same results again if I needed to dye more of the same fabric.  Clearly if I was seriously trying to achieve specific results I would need to be take a bit more of a scientific approach in the future.

Monday, 15 November 2010

City & Guilds Level 3 Machine Embroidery - Class 3, 12/11/10

In this class we had a go at making our own printing blocks from specialist material and our own items, such as rubber, cork - whatever seemed OK to experiment with.

I based my blocks on a couple of drain and manhole cover shapes, the ones that I had used for my Level 2 sample book and which I planned to revisit as part of the work on my wall hanging.  I guess it would be useful to include a few pictures of my sample book and sketch book from Level 2 as they'll say far more than words could.

My sample book cover
And some sample pages from inside the sample book


My Level 2 sketchbook cover

And some of the work inside


So that's a lot of work that's gone before.  Now here's a picture of the results from this session of stamp making and printing.  The items in the plastic bag (top left) are the 'stamps' cut out of bespoke stamp sheets, and also a standard large, flat eraser that has a shape cut on each side.  Then I've tried out the stamps on both coloured card and a large piece of calico.  The stamps obviously worked, but I had my reservations about the way that I wasn't able to create a precise, crisp finish.  Some of that is due to the difficulty of  cutting a well defined shape.  Some is getting just the right amount of ink on the stamp, even using a roller.  Another problem is the way the paint slips on the card (so blurs) and soaks up quickly into the fabric but not necessarily evenly nor without the image being distorted by the weave of the fabric.  Lots to bear in mind for future reference from this experiment!


Friday, 5 November 2010

Laura Kemshall Workshop - 30/10/10

Back in March 2010 I was one of 10 people who were winners in the Butterfly Magic Competition organised by Flair Magazine.   Part of the prize was taking part in a Master Class by Laura Kemshall run at VSM HQ in Redditch, Worcs to took place later in the year on 30th October so we had to wait a while for that part. 
When the day finally dame we all arrived complete with sewing machines, threads and other paraphernalia ready for a busy day – and what a busy day it was!
Laura introduced herself, saying that she had originally been taught by her mum.  She took a degree in embroidery, but since then had done more quilting, and for her it was all about stitch of some kind.  She respected the tradition of quilting, and indeed in recent years had had lots of success including competition wins for herself such as the Winner of the Quilter's Challenge Award at the Festival of Quilts with this masterpiece called Black Pearl:
Hand piecing, appliqué, drawing and painting with free motion quilting and digital quilting/embroidery
So what did we do at the workshop?  Well first of all for me personally we moved out of my 'comfort zone' and attempted to do 'proper' quilting.  Laura had brought along some pre-prepared fabric consisting of her own dyed fabric on top, batting in the middle and cotton backing.  Our first sample challenged us to produce continuous quilting lines, or as Laura called them "controlled marks".    We divided the sample into four and attempted four different stitches, point to point (continuous curves that formed almost a flower look), triangle vermicelle, crazy squares and contouring.  Laura advised that we should work outwards from the middle.  Of course we had no marks on the fabric to follow, so this was quite a test of machine control when stitching free motion.  Here's a picture of how my sample progressed:


OK, so it's very difficutl to see the stitching, but take my word for it it's not the best stitching in the world!  But it got me going and opened up a new area for me.

Then we moved on to creating shapes by producing a void.  For this one we looked for shapes created by the dyeing of the fabric, and highlighted them with taylor's chalk/fre zer paper/wash away pen or whatever method seemed best/appropriate.  Then we started to stitch found the area so that it became emphasised, ie we stitched the negative rather than the positive.  I found basic shapes that were a bit like butterflies on my sample, and here's a picture:


It's difficult to see, but there are two shapes that I've stitched around already, and three more marked up ready to stitch.  Laura gave us a handy hint for this technique: if we had a larger design then it is a good idea sto stitch less densely away from the motif so as to 'magnify' the non-stitched area.

For the third sample we did something similar, but different!  This time we stitched around the shapes that we saw in the colours on the fabric, keeping as continuous as possible and varying the stitch for interest.  Here's my sample:


I found this to be great fun, and enjoyed playing with the stitch length and width the vary the look.  I used a varigated thread which gave more dimension to the look.

For the last sample I played with couching threads in a series of continuous lines.  This gave a very dramatic affect very quickly and for me was the easiest sample to do:


I love the ease with which it is possible to create dimension and texture.

Of course there was quite a bit more to the packed day than just producing these samples, but publishing this on here brings back the memories for me.  Watching Laura sew, talking about her work, finding out about the other attendees, and, thanks to Liz from Flair Magazine and her mum, lots of lovely food to eat, including home made cake!  All in all a great day, and maybe at some time in the not too distant future I'll have a go at trying free motion quilt stitching again and become more adept at 'drawing' on quilted sandwiches using my sewing machine.

* * * *

As part of my City & Guilds Level 3 Machine Embroidery course we not only had to take a look into the history of wall hangings, but also research three textile designers who make wall hangings.  Naturally I included Laura as one of my three, and emailed her for further comments, particularly in respect of her work with SixArt (http://www.sixart.co.uk/) and a fascinating piece called 'Surrounded' against which she had said “As the fashion for art quilts grows, makers create quilts intended only for walls.”.  Her response included:


The comments about Surrounded are from a few years ago, but it still stands - my quilts are nearly all for walls. I idea with Surrounded was that the quilt was hung on a wall, but then peeled away from the wall and created a freestanding area that the viewer can stand inside. The concept was that although it was a wall quilt, it still offered the person some sense of comfort and protection that we associate with the traditional quilt. The inspiration for the surface decoration and form came from the tall hedges that are common in the landscape around where I live. They're commonly hawthorne or blackthorn and are at the same time quite forbidding, but also enclose space and provide protection.

Isn't it fascinating how one thing inspires is to create another, often in a way that would seem unrelated and possibly peculiar to an observer, but which makes perfect sense to those of us doing the creating?  Both the City & Guilds and OCA courses actively encourage the development of this skill in the student.  Not only do we need to become independent learners, but also to expand our creative potential.  I certainly think that this is happening for me.  However, chanelling that creative ability down specific routes when there are so many interesting potential diversions, and doing so in the restricted time that I have available, are definitely key challenges for me.  The personal contact with my tutor and peers on the City & Guilds course without a doubt makes it easier to be sure where you are and where you are going, and if you are on the right track.  The distance learning nature of the OCA course makes it more difficult to be sure that you are on the right track, sometimes leading you to start doubting your ability and what you have done, however carefully you might have endeavoured to follow the course instructions, and despite the fact that you're probably doing OK.  Perhaps as time goes by I will become more confident, but I often found that when I received the feedback during Textiles 1 I felt 'If I'd know that was what was expected I could have done that' because quite a few of the things that were expected weren't specified in the course material.  Anyway, I would certainly like to feel that an increase in my confidence levels will evolve.


PS:  Issue 18 of Flair Magazine included the following article and photos.  In case you're wondering I'm the one on the far right at the back in the cream top, nearly but not quite successfully hiding. ;o)


Friday, 22 October 2010

City & Guilds Level 3 Machine Embroidery - Class 2, 22/10/10

In Class 2 we did 2 key things:

1.  Agree our 'design brief' for the wall hanging we were going to make.  This is what I finally decided upon:


The Executive Business Centre is also my theme for Assigment 1, so I've got lots of things to thing about!

2.  Playing with coloured paper and shapes based on emerging ideas from our design brief theme.  Here are some photos of the results I've put in my sketchbook.

First of all playing with the curves that I've chosen for my theme, incorporating a bit of colour experitmentation - a bit like the fun of being back at school!

Then cutting out coloured paper and arrnaging the shapes to see what appeals.


Even if I don't use any/some/all of these ideas, it's a good way to get the 'juices flowing' and make me start to think about my subject.  So always a good technique to try, especially if you get 'stuck' for ideas as it can stimulate the grey cells.

Tuesday, 12 October 2010

Alexandra Palace, 09/10/10

The Knitting & Stitching Show at Ally Pally never lets you down.  This year I travelled on a coach with the Bournemouth Embroiderers Guild (my City & Guilds tutor is a member) so with only two pick up points we were there by 10.30 am.  Coach upon coach arrived, and the place was packed with those eager to view the exhibits and spend their hard earned cash.

As with so many others my interest in several crafts - plus of course my need to view things as both a craftsperson and a student - meant that I had much to see.  To make things 'worse' I've exhibited at AP on behalf of The Guild of Machine Knitters in the past, and the experience of the 'other side' means that I know a number of the exhibitors very well.

This year I made a conscious decision that I would choose an area of work on display that I particuarly liked and concentrate just on that, rather than try and fit too much in: there just isn't time in one day to look at everything!  Once I took a look at the knitting display my interest was caught, and the following shows just why:


Just loved Sophie's knitted cushions.  Great use of colour and texture; very attractive!  Her web site is still under construction, but I've added my name to the list to be informed when it's up and running so I can find out more.


 Rosie Boycott-Brown had some interesting textures in her knitwear.  Personally I don't go for blacks and greys and an 'industrial' look, so the articles in themselves didn't really appeal to me, but I admired some of her stitch structures which reminded me of my machine knitting roots and made me wonder if I could find time to use some knitting experimentation in my assignment sampling.


Deryn Relph's work really caught the eye of everyone going by - and no wonder!  It's bright, retro yet modern, practical and yet ornamental, recycling combined with re-birth.  Her web site has lots more intriguing photos and descriptions of her and her work.   http://www.derynrelph.co.uk/


There was one display of non-knitted work located nearby so that I couldn't miss it and couldn't resist.  Lindsay Taylor's display was fantastic, and made me feel inadequate in so many ways.  The machine embroidered plants looked so real.  The machine embroidered shoes were a masterpiece of disguise among their backgrounds in the glass cases.  A visit to her web site http://www.lindsay-taylor.co.uk/ to get to know her and her work is a must in my book.  I'd love to see her in action and learn more about what she does and why.  I might get the chance too at some point, since she only lives a relatively short distance away from me on the Isle of Wight ;o)  I wasn't the only one blown away by her display - my old machine knitting friend Ruth Lee (http://www.webs-of-intrigue.co.uk/gallery2.htm) happened to pass by while I was there and she adored Lindsay's shoes as well, probably because of the 'White Shoe Installation' work that Ruth did (something I wrote about in Textiles 1).

I'm not really a competitive person; usually my biggest 'challenge' is to improve my own standards.  My mother always says that no one could be more critical of what I do than I am.  I don't want to 'beat' people like Lindsay, rather I aspire to produce creative work that displays my imagination and abilities in the way that hers does for her.  It doesn't have to be like hers, just have that same 'wow' factor.  Whether I'll ever feel that I've reached that point is something very difficult to say.

Monday, 4 October 2010

City & Guilds Level 3 Machine Embroidery - Class 1

Friday 1st October was the first day of Level 3, so I thought I'd add a quick post about how things went.

In the end 10 of us were enrolled, although it's a mixture of those doing the 'old-style' Level 3 and those like me doing the 'new-style', and those only doing the 'advanced level' and those like me paying the extra to be registered for it to be a proper certificated C&G Level 3 Award.  In real terms we shouldn't notice too much difference from class to class as our tutor, Trisha Forshaw, plans to make each session rather like an individual workshop.

Anyway, this time around we were all busy playing with silk fibres in their various forms to make paper, or perhaps more accurately fibrous layers, to add to our portfolio of samples and potential ideas for incorporation in our finished wall hangings.  We were all very industrious, producing samples from fibres that still contained gum in the morning, and more using those fibres without the gum so requiring the addition of textile medium in the afternoon.  Here are pictures of the samples I made:

Natural and green dyed gummed silk fibres ironed together

Gummed silk fibres and dyed silk fibres ironed together

Gummed silk fibres stitched with silk embriodery thread, ironed to blend together

Strips of gummed pressed silk 'rods' woven with other fibres and ironed
Ungummed fibres + textile medium

Ungummed fibres + textile medium


So there we are, the results of some fun and fibre!

I'm off on the coach to the Knitting & Stitching Show at Alexandra Palace next Saturday, so hopefully will add an entry for some highlights - couldn't possibly include all! - of what I see there.